Showing posts with label NDT inspection Services - observations. Show all posts

Sunday, July 3, 2011

Brief introduction to Eddy Current Testing, Applications and Limitations

What are Eddy Currents? What is eddy current inspection?

Eddy current inspection is one of several NDT methods that use the principal of electromagnetism” as the basis for conducting examinations. Eddy currents are created through a process called electromagnetic induction. When alternating current is applied to the conductor, such as copper wire, a magnetic field develops in and around the conductor. If another electrical conductor is brought into the close proximity to this changing magnetic field, current will be induced in this second conductor.

 In brief Eddy currents are induced electrical currents that flow in a circular path.


 Where do we used Eddy Currents?
 • Crack detection   
 • Material thickness  measurements 
 • Coating thickness measurements  
 • Conductivity measurements


What are the advantages of Eddy current testing as NDT method?

• Eddy current inspection is an excellent  NDT Method for detecting surface and near surface discontinuities when the probable defect location and orientation is well known. 

• Sensitive to small cracks and other defects

• Inspection gives immediate results

• Equipment is very portable

• Test probe does not need to contact the part

• Inspects complex shapes and sizes of conductive materials


What are the limitations?

• Only conductive materials can be inspected

• Surface must be accessible to the test probe

• Skill and training required is more extensive than other NDT methods

• Depth of penetration is limited

Saturday, February 26, 2011

Comparision of major NDT methods for Nondestructive testing of Welds


Method
Equipment
Required
Enables
Detection of
Advantages
Limitations
Remarks
Visual
Magnifying glass
Weld sizing gauge
Pocket rule
Straight edge
Workmanship standards
Surface flaws - cracks, porosity, unfilled craters, slag inclusions Warpage, underwelding, overwelding, poorly formed beads, misalignments, improper fitup
Low cost.
Can be applied while work is in process, permitting correction of faults.
Gives indication of incorrect procedures.
Applicable to surface defects only.
Provides no permanent record.
Should always be the primary method of inspection, no matter what other techniques are required.
Is the only "productive" type of inspection.
Is the necessary function of everyone who in any way contributes to the making of the weld.
Radiographic
Commercial X-ray or gamma units made especially for inspecting welds, castings and forgings.
Film and processing facilities.
Fluoroscopic viewing equipment.
Interior macroscopic flaws - cracks, porosity, blow holes, nonmetallic inclusions, incomplete root penetration, undercutting, icicles, and burn through.
When the indications are recorded on film, gives a permanent record.
When viewed on a fluoroscopic screen, a low-cost method of internal inspection
Requires skill in choosing angles of exposure, operating equipment, and interpreting indications.
Requires safety precautions. Not generally suitable for fillet weld inspection.
X-ray inspection is required by many codes and specifications.
Useful in qualification of welders and welding processes.
Because of cost, its use should be limited to those areas where other methods will not provide the assurance required.
Magnetic
Particle
Special commercial equipment.
Magnetic powders - dry or wet form; may be fluorescent for viewing under ultraviolet light.
Excellent for detecting surface discontinuities -
especially surface cracks.
Simpler to use than radiographic inspection.
Permits controlled sensitivity.
Relatively low-cost method.
Applicable to ferromagnetic materials only.
Requires skill in interpretation of indications and recognition of irrelevant patterns.
Difficult to use on rough surfaces.
Elongated defects parallel to the magnetic field may not give pattern; for this reason the field should be applied from two directions at or near right angles to each other.
Liquid Penetrant
Commercial kits containing fluorescent or dye penetrants and developers.
Application equipment for the developer.
A source of ultraviolet light - if fluorescent method is used.
Surface cracks not readily visible to the unaided eye.
Excellent for locating leaks in weldments.
Applicable to magnetic and nonmagnetic materials. Easy to use. Low cost.
Only surface defects are detectable.
Cannot be used effectively on hot assemblies.
In thin-walled vessels will reveal leaks not ordinarily located by usual air tests. irrelevant surface conditions (smoke, slag) may give misleading indications.
Ultrasonic
Special commercial equipment, either of the pulse-echo or transmission type.
Standard reference patterns for interpretation of RF or video patterns.
Surface and subsurface flaws including those too small to be detected by other methods.
Especially for detecting subsurface lamination-like defects.
Very sensitive.
Permits probing of joints inaccessible to radiography.
Requires high degree of skill in interpreting pulse-echo patterns. Permanent record is not readily obtained.
Pulse-echo equipment is highly developed for weld inspection purposes.
The transmission-type equipment simplifies pattern interpretation where it is applicable.

Sunday, February 6, 2011

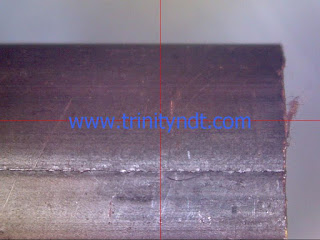
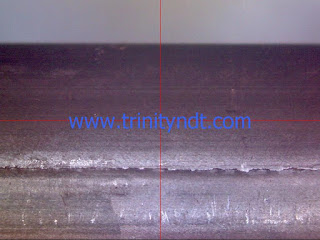
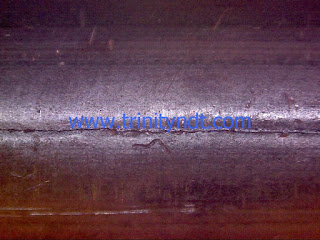
Cracks on steel tubes observed using magnetic particle testing


'Trinity NDT' carried out raw material NDT on steel Dia 16mm tubes. The cracks observed on ST52 tube material are reproduced here. Some of them are through thickness cracks. The team segregated the defective materials using magnetic particle testing. Visit: www.trinityndt.com to know more about the NDT inspection services and training and certification courses.

Thursday, December 2, 2010

Trinity NDT's 9th Anniversary Celebrations held on 01st December 2010


Trinity NDT celebrated 9th Anniversary on 01st December 2010. 
   
Posted on 02nd December 2010 at 05.19P(IST)

Tuesday, September 14, 2010

NDT Inspection of Bearing and Aerospace Components - Discontinuities


      Cracks of length around 10-16mm observed on a bearing component during magnetic particle inspection using Yoke type Fluorescent Wet technique

Porosity Areas observed on an aerospace component during Liquid Penetrant testing-DPT/PT using Visible Solvent removable Penetrant Technique

Friday, April 23, 2010

Ultrasonic testing-UT, magnetic particle inspection-MPT of LPG tanks in India - Trinity NDT, India

Trinity NDT, India inspected LPG tanks for integrity and to find out service induced discontinuities in India. All the weld joints of LPG tanks are tested by Ultrasonic testing using normal beam and angle beam as well. The weld joints also tested for surface and subsurface flaw detection using magnetic particle testing-MPT. Tanks are throughly cleaned to remove All the weld joints got accepted as no harmful flaws observed.Testing of tanks is done as a routine in service inspection by the client using nondestructive testing-NDT.


Trinity NDT inspection team is professional in approach with experts having diversified experience to inspect such critical parts for their integrity. Trinity NDT institute for the first time introducing actual inspection case studies exclusively for the candidates attending Level 1, 2 training & certification programs in NDT and welding inspector courses at the institute's training centers all over India.

For additional information about inspection activities of the company, level 1, 2 NDT training courses schedules at the institute in India contact us or visit: www.trinityndt.com

Friday, March 5, 2010

Inservice inspection - Crack detection by magnetic particle testing at Bangalore, India


Team 'Trinity NDT' carried out magnetic particle testing (inspection)-MPT for a rotary shaft during in-service inspection as a routine test in Bangalore, India. The part is offered for crack detection by magnetic particle testing. It is observed that the part contains clustered cracks of very high intensity in nature.

The same shaft is subjected to Ultrasonic testing (inspection) -UT and revealed severe piping flaws inside. The depth of flaws are estimated by Ultrasonic testing - UT and found to be around 45mm from the surface.

Team 'Trinity NDT' personnel performed the above tests within the shortest possible time and helped the process plant to take up the production within minutes after replacing with new shaft.

Trinity NDT is an inspection services providing company in India and providing inspection services in Ultrasonic flaw detection, magnetic particle testing, dye penetrant testing, radiographic testing/radiography, thickness gauging, material testing services and conducting level 1, 2 training and certification courses through 'Trinity Institute of NDT Technology' all over India. For more information about the professional, reliable, timely and expert solutions, services please visit: www.trinityndt.com or call +91 99009 29439 / 98441 29439